How to See and Photograph the Northern Lights

by

Have you ever dreamed of seeing the colorful Northern Lights dancing in the night sky? Here’s how to find and photograph the stunning Northern Lights in Iceland!

Witnessing the magic of the Northern Lights at least once is a bucket list experience for most people. I have been lucky enough to see and photograph the “Northern Lights” many times in several different countries, including Iceland.

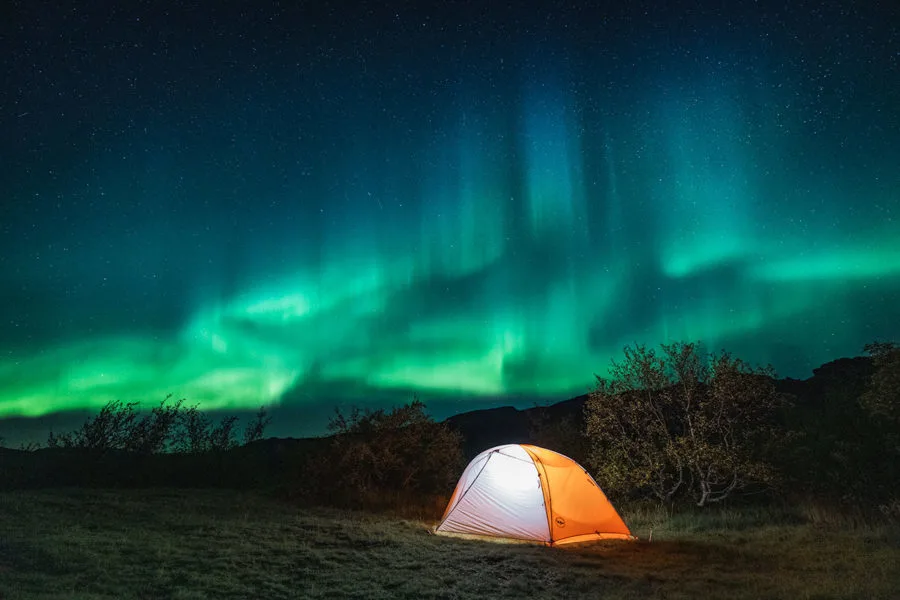
The Northern Lights can mesmerize you for hours watching their mysterious green glow dance across the sky over mountains or sea.

Tracking and taking amazing photos of the Northern Lights in Iceland is always a top priority when I visit!

However, many people don’t realize that this incredible natural phenomenon is often elusive and unpredictable.

So, to help improve your chances, I’ve put together this guide on how to see and photograph the Northern Lights in Iceland. I’ll share some tips on how to find them, where to see them, and the camera settings and editing techniques I use.

Northern Lights Photography Guide

How to Find the Northern Lights in Iceland

So why are the Northern Lights so hard to see, even in Iceland? Well, that’s because many different factors are involved.

For the best Northern Lights experience, you need dark skies, clear weather and strong aurora activity. Ensuring that all of these requirements fit together took some planning.

looking for dark skies

For the same reason stargazing is better in the dark, viewing the Northern Lights is also best in the dark. Light pollution from towns hinders the experience.

Yes, you can occasionally see the lights of Iceland’s capital, Reykjavik. However, you’ll have more luck in the countryside, away from artificial light sources.

avoid the full moon

Try to avoid hunting for the Northern Lights during a full moon if you can. The brightness of the moon can make it more difficult to see the aurora in the sky.

Also, remember that the moon rises and sets like the sun. So you can try to time the Northern Lights hunt when the moon is hidden below the horizon for maximum darkness.

My favorite smartphone app for viewing moonrises and moonset times around the world is called Photographer’s Ephemeris.

That said, sometimes a little moonlight from the 1/4 moon can also illuminate the background landscape enough to create some spectacular images!

wait for sunny weather

If it’s cloudy, you won’t be able to spot the Northern Lights. So pay attention to the weather forecast, especially cloud cover (infrared satellite imagery helps a lot).

While you may still see some aurora if it’s only partly cloudy, you’ll have the best chance when there are no clouds at all.

My favorite smartphone app for checking cloud conditions around the world is called MeteoEarth.

Check Aurora Forecast

Because auroral activity originates from the sun in space, scientists were able to predict its strength by observing the sun’s solar wind and the strength of Earth’s magnetic field. This “KP Index” ranges from 0-9.

From my experience, when the KP index is 3 or 4, you might be lucky enough to see the Northern Lights in Iceland. If you are lucky enough to be there (KP 5+) when the solar storm hits, then you are in for a great show!

My favorite smartphone app for forecasting the aurora is called My Aurora Forecast Pro.

It will send a push notification when there is an opportunity to see lights near you!

For global aurora forecasts, space weather cheers are also good.

Self-driving and group travel

You should be able to rent a car in Iceland and go hunt for the Northern Lights yourself. Another option is to rent a camper van so you can get away from the town and its streetlight pollution.

If you’re visiting Iceland in winter, it’s helpful to experience snow driving, as conditions can sometimes be quite harsh. Big snowstorms are common.

I prefer to explore on my own as it gives me the freedom to stay out all night or move locations as I please.

However, if you don’t feel comfortable driving in Iceland at night, there are also plenty of organized Northern Lights tours.

Best time to see the Northern Lights

The best season to see the Northern Lights in Iceland is autumn and winter from September to April. The absolute darkest months are November and February, but these months can also have the worst weather.

Remember that you need darkness away from town, clear skies and strong auroral activity to see the Northern Lights.

Witnessing the Northern Lights in Iceland during summer is very rare as there are nearly 20 hours of sunshine per day near the Arctic Circle.

The more time you spend in Iceland, the better your chances of spotting the lights. If you’re just on a 2-day stopover, you need a lot of luck to see them. If you want to hunt for the Northern Lights, I recommend you spend at least 7 days in Iceland.

Even so, it can be difficult. Some people can visit Iceland multiple times and never see them!

If you’re bar hopping in Reykjavik, you probably won’t see the Northern Lights.

The main reason I was able to capture such great photos of the Northern Lights was that I was out all night, many nights, driving around looking for them. It takes some dedication.

where to look for the aurora

The best places to see the Northern Lights are in northern latitudes. Think near the Arctic Circle.

The best observation latitude is between 68 degrees north latitude and 74 degrees north latitude. This includes Iceland. But some other great locations are the northern regions of Norway, Sweden and Finland.

Greenland, Russia, Alaska and Canada are also major Northern Lights tourism destinations.

Remember to look north!

Although it may seem obvious, remember to look north! The lights dance along the tape near the Arctic Circle, so you’ll need to keep your eyes north to see them.

Typically, the light starts out low and slowly increases in intensity.

The faint auroral activity appears gray to the naked eye. Much like a cloud or fog moving in the wind. They’re easy to miss if you’re not aware of them.

Point your camera at something gray and take a long exposure photo (20 seconds or so). If these “clouds” appear green in your image, they are not clouds! You are witnessing a weaker version of the Northern Lights.

The stronger the auroral activity, the brighter the colors.

The most common color of the Northern Lights you will see is green. But, if you’re lucky, they can also be blue, red, and orange, depending on which atmospheric gases happen to be prevalent.

Northern Lights Photography Tips

Once you’ve located the aurora, capturing decent images of it is a whole new challenge. Here are some tips to help you photograph the Northern Lights in Iceland.

best photography gear

In most photography situations, the quality of your gear doesn’t matter. However, for Northern Lights and stellar photography, it does.

Below is a list of my recommended photography gear you’ll need to capture some great low-light photos. You can also see all my photography gear here.

  • Digital camera with manual mode and high ISO capability
  • Wide-angle lens (24mm or wider) with a fast aperture (minimum 2.8 – 4.0)
  • sturdy tripod
  • 2-3 extra batteries
  • cold weather clothing
  • Hand Warmers

You need a high-quality camera (brand doesn’t matter) with a large sensor to keep noise to a minimum at high ISO settings.

Wide-angle lenses are helpful for capturing large landscapes with the night sky in them.

Fast lens apertures allow the maximum amount of ambient light into your lens.

A sturdy travel tripod allows you to shoot long exposures without a camera shake.

The extra batteries give you the flexibility to stay out all night waiting for peak activity – plus cold weather drains them faster.

How to Focus Your Camera at Night

Even with the best camera gear and knowledge of the best settings, your photos of the Northern Lights will not be sharp/clear without proper focus.

There are a few different ways to focus the camera at night, but my favorite is to focus on distant landmarks on the horizon (such as mountains).

This is easier to do before the sun goes down so it’s not too dark.

Most cameras have an infinity focus setting (∞), but it’s not always accurate. Zoom in as much as possible and manually adjust the focus if needed.

After locking, please remember to turn off “autofocus” and don’t touch the lens focus ring. Sometimes it helps to “tape” the focus ring down so you don’t accidentally move it later.

Northern Lights Camera Setup

You’ll have to experiment with the setup all night because of the constant changes in light levels and movement.

Your camera should be set to manual mode so that you can change each specific setting yourself.

Image Format Most professional photographers shoot in RAW format
rather than JPG, as it provides the greatest amount of information, allowing for greater flexibility in later post-processing.

This isn’t required, but it does give you more leeway when editing images.

Aperture (F-stop)
You want to capture as much light as possible, so use the widest (fastest) aperture your lens has. I recommend an aperture between F4.0 and F2.8.

Shutter Speed ​​Depending on how fast or how bright the lights are moving, you will need to adjust your shutter speed
(exposure) accordingly. Anything from 2 seconds to 13 seconds is a good starting point.

The faster the light moves, the shorter the shutter speed should be. Otherwise, you’ll end up with a large overexposed green sky…

ISO The last setting you should adjust for photos of the Northern Lights is  ISO
. Raising the ISO allows the sensor to capture more light. The downside is that the higher the ISO, the more sensor noise, resulting in grainy images.

Generally, I use an ISO of 1000 – 4000 for Northern Lights photos and this seems to work best.

Postprocessing the Aurora Image

Once you have a decent image, you can use post-processing software to enhance your photo of the Northern Lights in Iceland. I personally use a combination of Adobe Lightroom and Adobe Photoshop, but there are others.

They all basically do the same thing. How much you do with your photos is a matter of preference. Remember, art is subjective! You and I probably don’t like the same things.

Post-processing is a huge topic though, so I’ll give you a super quick overview of what I did to enhance my Northern Lights images and make them really pop.

  • adjust white balance
  • increase exposure
  • brighten shadows
  • brighten white
  • darken highlights
  • Improve clarity, vibrancy and saturation
  • Adjust Curve
  • noise
  • Sharpen the knife

Happy Northern Lights hunting!

The photography of the Northern Lights in Iceland shown here was taken in the fall, during many trips while driving on Iceland’s famous Ring Road.

Lights usually start low and increase in intensity over several hours. The best photos are taken during peak aurora activity, which usually only lasts about 10-15 minutes.

Patience and dedication are very important to Northern Lights photography…you need to stick around long enough for the good stuff to show.

With a little planning, a lot of waiting, and a little luck, you too can witness this amazing natural phenomenon called the Northern Lights in Iceland.

There is nothing better than seeing the Northern Lights in person! This is magic. ★

You may also like

Leave a Comment